Moss walls look calm and clean. Then a musty smell shows up, or you spot a fuzzy patch near an edge. That’s mold, and it can happen indoors when moisture hangs around too long.
The good news is you can prevent most mold on moss walls with a few clear rules. Control humidity, avoid wet cleaning, keep air moving, and choose the right moss for the space. This guide walks you through what causes mold on moss walls and how to stop it without ruining the look.
Why moss walls grow mold indoors

Mold needs three things: moisture, a food source, and time. A moss wall can supply all three if conditions line up.
- Moisture from high indoor humidity, leaks, or condensation
- Organic material (moss, dust, and any backing made from wood or paper-based products)
- Still air that lets damp pockets stay damp
Many people assume moss causes mold by itself. Usually, the real issue is the room. Bathrooms without fans, basements, poorly ventilated offices, and exterior walls that get cold in winter all raise risk.
Preserved moss vs living moss and why it matters
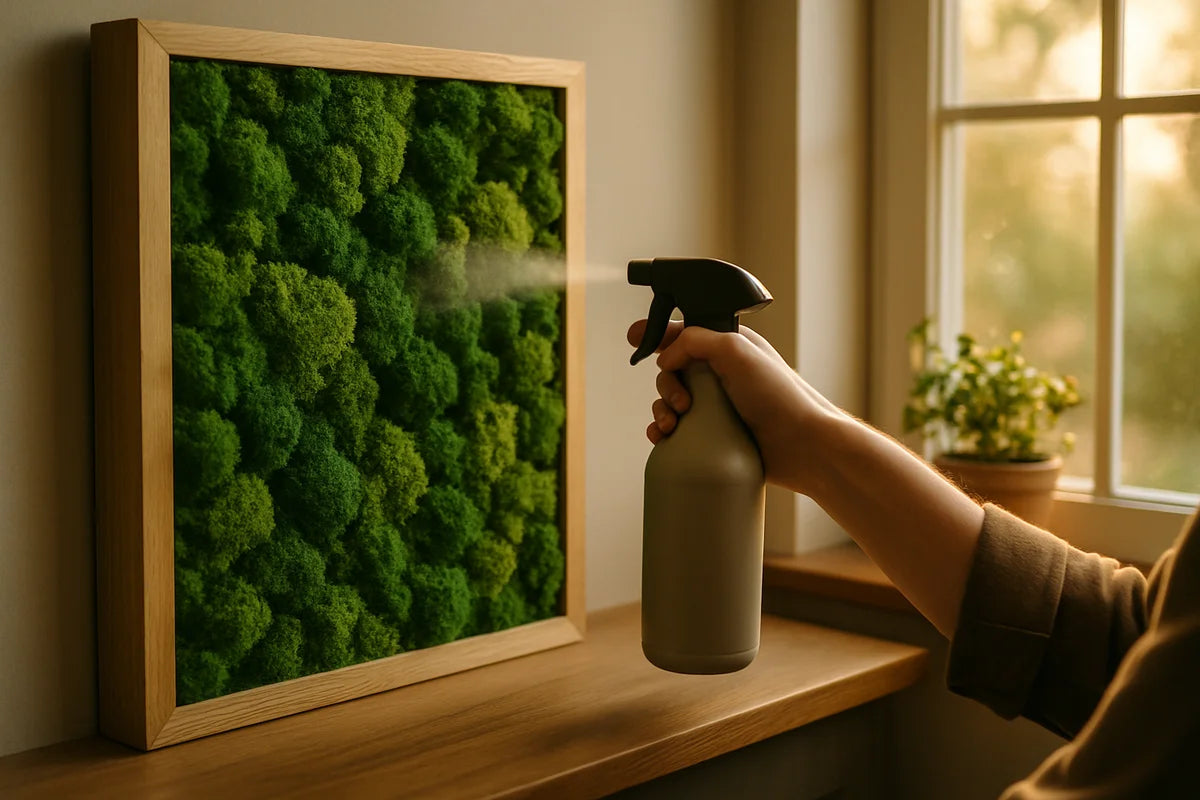
Most indoor moss walls use preserved moss. Manufacturers treat it (often with glycerin-based solutions and dyes) so it stays soft without watering. In a normal room, preserved moss should not need misting. If someone sprays it “to freshen it up,” they often start the mold problem.
Living moss walls are a different animal. They need water, light, and a system that handles drainage. If you want living moss indoors, you need a setup designed for plants, not decor.
Dust is a quiet trigger
Dust adds food for mold and holds moisture. A moss wall near a kitchen, a return vent, or a busy hallway collects more dust than you think. That dust can tip a borderline humidity problem into a real one.
Set the right indoor humidity for a moss wall
If you want to keep moss walls from growing mold indoors, start with humidity. Mold risk climbs when indoor relative humidity stays high for long periods. Many indoor air quality guides recommend keeping it in a moderate range to reduce mold growth. The U.S. Environmental Protection Agency covers the basics in its mold resources, including moisture control as the core strategy. See EPA guidance on mold and moisture.
Aim for a steady target, not a perfect number
For most homes, a practical target is around 40% to 55% relative humidity. Short spikes happen. Long stretches above 60% are where moss walls can start to smell musty, especially in corners or behind frames.
Measure humidity where the moss wall lives
Don’t rely on how the room feels. Use a small hygrometer and place it near the wall for a few days. If you want a quick reference on how humidity affects comfort and building materials, Penn State Extension has a solid overview in its home humidity and ventilation content. Check Penn State Extension on humidity and ventilation.
- If the moss wall sits on an exterior wall, measure during cold weather too.
- If it’s near a shower or cooking area, measure during those activities.
- If the room has a mini split or central air, measure with the system on and off.
Use a dehumidifier when the room can’t hold the line
Some spaces run humid no matter what you do. Basements, garden-level apartments, and coastal homes often need a dehumidifier to keep mold away.
If you’re choosing a unit, match the capacity to the room size and moisture load. For a practical sizing walkthrough, see ENERGY STAR dehumidifier guidance. It won’t pick a model for you, but it helps you avoid buying one that’s too small to matter.
Stop adding water to preserved moss
This is the most common mistake. Preserved moss walls do not need misting. Water gets trapped deep in the moss and backing, then dries slowly. That slow dry time is mold’s favorite setup.
Skip these “care tips” that cause mold
- Misting the wall to “restore color”
- Spraying essential oils or room sprays onto the moss
- Wiping with wet cloths or using steam cleaners
- Using plant fertilizers or leaf shine products (they don’t belong on preserved moss)
If your wall looks dull or feels stiff, that can mean the air is too dry, not that the moss needs water. Preserved moss can firm up in very dry conditions. Fix the room humidity rather than spraying the wall.
Make airflow your mold insurance
Even with decent humidity, mold can grow in dead-air zones. A moss wall mounted flush to a surface, surrounded by trim, or placed in a corner may stay damp longer after temperature swings.
Simple airflow fixes that don’t ruin the look
- Run the bathroom fan longer if the moss wall sits anywhere near a bath or shower.
- Use a quiet ceiling fan on low in nearby rooms.
- Angle a small fan across the room for an hour or two on humid days.
- Don’t block supply or return vents with furniture near the moss wall.
If you’re unsure what “good ventilation” means for mold prevention, the CDC keeps it straightforward: reduce moisture and improve airflow. See CDC information on mold.
Watch for cold-wall condensation
Condensation forms when a wall surface gets cold and humid air hits it. Moss can hide that problem until mold appears.
- If the wall feels colder than the room in winter, raise the thermostat a bit or improve insulation.
- Keep large swings in humidity down (like long hot showers with the door open).
- Maintain a small air gap behind panel-mounted moss if possible.
Choose safer placement for indoor moss walls
Where you hang the wall matters as much as how you care for it. If you place it in a high-risk spot, you’ll fight mold forever.
Best locations
- Living rooms and bedrooms with steady HVAC and moderate humidity
- Hallways with decent airflow
- Offices that stay climate controlled
High-risk locations (think twice)
- Bathrooms without strong exhaust fans
- Above kettles, stoves, or dishwashers
- Basements that smell damp or feel cool and clammy
- Directly over radiators or near humidifiers (drying and wetting cycles stress the material and invite issues)
If you really want a moss wall in a bathroom, treat it like you would artwork: place it far from the shower, run the fan, and keep humidity under control every day.
Clean the moss wall without feeding mold
Cleaning keeps dust from becoming mold food, but the wrong cleaning method adds moisture and makes the problem worse.
Dry cleaning is the default
Start with the least aggressive option.
- Turn off nearby fans so dust doesn’t blow into the room.
- Use a soft brush, feather duster, or a microfiber duster to lift dust off the surface.
- If needed, use a vacuum on low suction with a brush attachment, held slightly off the moss to avoid pulling pieces out.
Spot-cleaning small marks
If you must spot-clean, use as little moisture as possible. Dampen a cloth lightly, then blot. Don’t rub. Don’t soak. And don’t spray the moss directly.
Many moss wall makers give specific care steps based on their preservation method and backing. If you know the brand, check their care page and follow it.
How to tell mold from normal moss changes
Moss isn’t plastic. It changes with humidity, light, and age. That can look like a “problem” when it isn’t.
Signs it’s probably mold
- Musty or sour odor close to the wall
- Fuzzy growth that looks like lint, powder, or soft patches
- New discoloration that spreads over days or weeks
- Symptoms in the room that improve when you ventilate (stuffy feeling, irritation)
Signs it’s probably not mold
- Even fading from sunlight over months
- Stiffness during very dry periods
- Minor shedding when bumped (common with some moss types)
If you suspect mold and you have allergies, asthma, or immune issues, take it seriously. For a plain-language overview of health concerns tied to indoor mold, Cleveland Clinic offers a useful explainer. See Cleveland Clinic on mold exposure.
What to do if you find mold on a moss wall
Act fast. Mold spreads, and the longer it sits, the deeper it can get into backing materials.
Step 1: Fix the moisture source first
If you skip this, the mold will return.
- Drop room humidity with ventilation or a dehumidifier.
- Check for leaks from windows, plumbing, or roofs near the wall.
- Look for condensation patterns, especially on exterior walls.
Step 2: Isolate the area
Open windows if outdoor air is drier. Keep kids and pets away while you assess. If you see widespread growth or smell strong mustiness across the room, consider calling a pro.
Step 3: Decide if it’s a small spot or a bigger job
For small surface spots, you may be able to remove and replace the affected moss section, depending on how the wall was built. For larger areas, replacement often makes more sense than trying to “treat” the moss.
Be cautious with bleach and strong sprays. They add moisture and can damage dyes and adhesives. They can also irritate your lungs in an indoor space.
If you want a clear standard for when you should bring in help, the IICRC is a major body in cleaning and restoration. Their mold remediation guidance helps frame what a proper job looks like. See IICRC resources on cleaning and restoration standards.
Step 4: Replace what you can’t dry
If the backing board got wet, it may hold moisture long after the surface looks fine. Mold can live behind the moss where you can’t see it. In that case, replacing the panel is often the cleanest fix.
Build a simple prevention routine you’ll actually do
You don’t need a long checklist. You need a few habits that keep conditions stable.
Weekly (5 minutes)
- Look and smell: check edges, corners, and any shaded spots.
- Check humidity on your hygrometer.
- Run a dry duster over areas that catch dust.
Monthly (10 to 20 minutes)
- Vacuum gently with a brush attachment if dust builds up.
- Clean nearby vents and check that air can move freely.
- If you use a dehumidifier, clean the filter and empty and rinse the tank.
Seasonal (when weather changes)
- Recheck humidity when heat or AC season starts.
- Watch for condensation during cold snaps.
- Adjust fan run times in bathrooms and kitchens.
Buying tips that reduce mold risk before you hang the wall
If you’re shopping for a moss wall or planning a DIY panel, a few choices make mold less likely.
Ask about the backing and mounting
- Choose moisture-resistant backing when possible.
- Avoid untreated MDF in humid rooms.
- Mount in a way that doesn’t trap moisture against the wall if your space runs humid.
Pick moss types that match the space
Some moss textures hold more dust and moisture than others. Your seller can tell you what they used and how it behaves. If they can’t answer basic care questions, that’s a red flag.
Skip the “needs misting” pitch for preserved walls
If a seller tells you preserved moss needs regular spraying, keep shopping. That advice leads straight to mold in many homes.
Looking ahead with a moss wall you won’t have to babysit
Once you control humidity and stop adding water, moss walls become low work. You’ll spend a few minutes a month dusting and checking the room, not fighting stains and smells.
If you want the easiest next step, buy a small hygrometer, track your room for a week, and adjust from there. If humidity won’t stay in range, solve that first. Your moss wall will look better, and your whole home will feel cleaner.

